Antons Video Productions
20 Solander Ave
West Hoxton 2171 NSW, Australia
+612 9825 9999
Using TmpgEnc 4 Xpress for downscaling EDIUS HD to PAL or NTSC SD with superb results, no downscaling artifacts, ideal for DVD production.
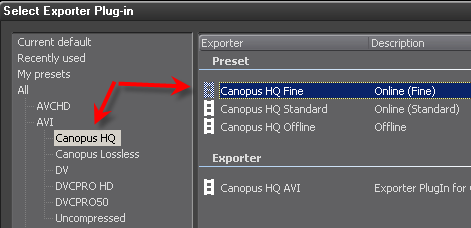
1. Export your EDIUS timeline to Canopus HQ Fine Quality or Canopus Lossless. Be sure Edius project setting is set to Standard Color space conversion.

2. Open the HD 1440x1080i (interlaced) or 1920x1080i (interlaced) file and make sure it is changed to interlaced with top field first.


3. Go to Filters, select Resize Filter and make sure both options are unticked and Lancos3 is used for resize method

These settings are responsible for the excellent downscaling quality, eliminating all downscaling artifacts.

4. select your DVD export template and configure as required.

5. Use the resulting files directly in your authoring software such as DVD Lab Pro etc.
NOTE: If your timeline contains titles and graphics with fine detail, I recommend you turn off any title and graphics tracks prior to exporting Edius timeline to Canopus HQ. (Titles and graphics with fine detail don't downscale perfect with the above steps).
Then do the down conversion with TmpgEnc4 Xpress as in the below steps
change your Edius HD project setting to SD
turn off the existing video layers and turn on all title and graphics layers
add a new video track above the existing video and add the T4 converted Canopus HQ or Lossless
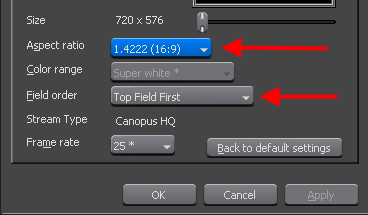
change field order to top and aspect ratio to 16:9
export to Canopus HQ and then convert to DVD using TmpgEnc 4 Xpress (for best results) etc. or use the buily in Disk Burner program (not as sharp).
Other possibilities and options
If you need an avi file instead, use the following template and make settings accordingly

Select the codec of your choice, like Canopus HQ or Lossless

Note: the resulting avi file will have the wrong aspect and field order, so be sure to correct this after loading the clip in an SD project.

Back to more Video Editing Tips and Tricks